Create a custom XML for Multi-App Kiosk Mode in Microsoft Intune
- Sam Vokes

- Feb 13, 2023
- 4 min read
Updated: Jan 1, 2025
The following guide will assist with creating a custom XML for Multi-App Kiosk Mode in Microsoft Intune. A kiosk device typically runs a single app, and users are prevented from accessing any features or functions on the device outside of the kiosk app. The AssignedAccess configuration service provider (CSP) was expanded to make it easy for admins to create kiosks that run more than one app.
Microsoft Intune provides a configuration profile for admins to create Single App Kiosk Mode or Multi-App Kiosk Mode, however, some management options aren't available e.g. allow removable media.
For this particular requirement, the Multi-App Kiosk mode device must allow removable storage for a particular task. The inbuilt configuration profile in Microsoft Intune does not support this particular option, so a custom XML file is required to add this setting.
Now, Microsoft's documentation for Multi App Kiosk mode can be a little confusing, and it took me a while to figure out what schemas were required in the XML. So here is a breakdown of what will be required and what settings must be in the XML for this to work.
Assigned Access Configuration
An Assigned Access Configuration section is required where you reference the schemas required for your profile. So if you require e.g. Folder Access settings, you reference the schema that supports that particular setting.
<?xml version="1.0" encoding="utf-8" ?>
<AssignedAccessConfiguration
    xmlns="http://schemas.microsoft.com/AssignedAccess/2017/config"
    xmlns:v2="http://schemas.microsoft.com/AssignedAccess/201810/config"
    xmlns:v3="http://schemas.microsoft.com/AssignedAccess/2020/config"
>
Microsoft tend to update what you can do with the schemas depending on the version of Windows you are using, so from my perspective, to get the most out of the configurable options, upgrade your Windows device to the latest feature version if possible.
Profiles
Depending on your requirements, you can create multiple profiles in one XML and assign it to different groups of users. Each profile will require the settings noted in this document but to keep it simple, I'm writing this blog specific to one profile. If you require multiple profiles, you can use Microsoft's guide for formatting examples
Each profile must have a unique profile GUID. You can use a GUID generator to generate GUIDs for your profile.
Note: Any time the XML is updated in Microsoft Intune, a new GUID is required for each profile where the settings have been adjusted.
    <Profiles>
        <Profile Id="{75076b41-9f9m-4b8r-accb-75kc6bce20a6}">
Apps List
Next you will create a list of approved apps that are allowed to be used on the device. Applications can be either Win32 apps or UWP apps. For UWP apps, you must provide the App User Model ID (AUMID), for Win32 apps, the full path of the executable file must be given in your allowed apps list.
To find the AUMID of an application you can use:
Get-StartAppsOr use Windows Explorer. Microsoft provide some information on how to do this: Find the Application User Model ID of an installed app - Configure Windows | Microsoft Learn
Once you have your application list, you must then add this to your XML. For my example, we will use Quick Assist, Explorer and Edge.
<Profiles>
        <Profile Id="{75076b41-9f9m-4b8r-accb-75kc6bce20a6}">
            <AllAppsList>
                <AllowedApps>
                    <App DesktopAppPath="%windir%\explorer.exe" />
                    <App AppUserModelId="MicrosoftCorporationII.QuickAssist_8wekyb3d8bbwe!App" />
                    <App DesktopAppPath="C:\Program Files\WindowsApps\MicrosoftCorporationII.QuickAssist_2.0.6.0_x64__8wekyb3d8bbwe\QuickAssist.exe" />
                    <App DesktopAppPath="C:\Program Files (x86)\Microsoft\Edge\Application\msedge.exe" />
                    <App DesktopAppPath="C:\Program Files (x86)\Microsoft\EdgeWebView\Application\106.0.1370.52\msedgewebview2.exe" />
                </AllowedApps>
Note: any application dependencies must also be added to the application list, for example, Quick Assist relies on Edge WebView.
Note: i've included Quick Assist twice in my example because i can't remember which one worked during testing.
File Explorer Namespace Restrictions
For this particularly requirement, we wanted to allow access to the Downloads folder on the Kiosk device.
            <v2:FileExplorerNamespaceRestrictions>
                <v2:AllowedNamespace Name="Downloads"/>
Allow removable media
Again, for this particular requirement, we wanted to allow removal media on the Kiosk device.
<v3:AllowRemovableDrives/>Start Layout
A Start Layout is a required parameter in the XML. You can create your own layout by running:
Export-StartLayout -UseDesktopApplicationID -Path layout.xmlThen paste the code into the XML. My full example will show you the correct format further down.
Taskbar
Allow or deny access to the task bar. For this particular requirement we allowed it.
<Taskbar ShowTaskbar="true"/>Assignment
Each profile you create can be assigned to local users, domain users or an Azure AD Group. For my example, we wanted the profile assigning to a specific group of users in Azure AD as this was an Azure AD Joined device.
    <Configs>
        <Config>
            <UserGroup Type="AzureActiveDirectoryGroup" Name="b823d189-65b2-42bc-8275-ceg28c53a28d" />
The Name reference is the Object ID for the group in Azure AD.
Default Profile
The default profile is the profile ID you are assigning your group to. This must match your profile GUID you created at the start.
<DefaultProfile Id="{75076b41-9f9m-4b8r-accb-75kc6bce20a6}"/>Bringing it all together
The following XML can be used as a reference based on the information I've provided in this blog post:
<?xml version="1.0" encoding="utf-8" ?>
<AssignedAccessConfiguration
    xmlns="http://schemas.microsoft.com/AssignedAccess/2017/config"
    xmlns:v2="http://schemas.microsoft.com/AssignedAccess/201810/config"
    xmlns:v3="http://schemas.microsoft.com/AssignedAccess/2020/config"
>
    <Profiles>
        <Profile Id="{75076b41-9f9m-4b8r-accb-75kc6bce20a6}">
            <AllAppsList>
                <AllowedApps>
                    <App DesktopAppPath="%windir%\explorer.exe" />
                    <App AppUserModelId="MicrosoftCorporationII.QuickAssist_8wekyb3d8bbwe!App" />
                    <App DesktopAppPath="C:\Program Files\WindowsApps\MicrosoftCorporationII.QuickAssist_2.0.6.0_x64__8wekyb3d8bbwe\QuickAssist.exe" />
                    <App DesktopAppPath="C:\Program Files (x86)\Microsoft\Edge\Application\msedge.exe" />
                    <App DesktopAppPath="C:\Program Files (x86)\Microsoft\EdgeWebView\Application\106.0.1370.52\msedgewebview2.exe" />
                </AllowedApps>
            </AllAppsList>
            <v2:FileExplorerNamespaceRestrictions>
                <v2:AllowedNamespace Name="Downloads"/>
                <v3:AllowRemovableDrives/>
            </v2:FileExplorerNamespaceRestrictions>
            <StartLayout>
                <![CDATA[<LayoutModificationTemplate xmlns:defaultlayout="http://schemas.microsoft.com/Start/2014/FullDefaultLayout" xmlns:start="http://schemas.microsoft.com/Start/2014/StartLayout" Version="1" xmlns="http://schemas.microsoft.com/Start/2014/LayoutModification">
                      <LayoutOptions StartTileGroupCellWidth="6" />
                      <DefaultLayoutOverride>
                        <StartLayoutCollection>
                          <defaultlayout:StartLayout GroupCellWidth="6">
                            <start:Group Name="Applications">
                              <start:DesktopApplicationTile Size="2x2" Column="4" Row="0" DesktopApplicationID="Microsoft.Windows.Explorer" />
                              <start:DesktopApplicationTile Size="2x2" Column="2" Row="0" DesktopApplicationID="MSEdge" />
                            </start:Group>
                            <start:Group Name="Support">
                                <start:Tile Size="2x2" Column="0" Row="0" AppUserModelID="MicrosoftCorporationII.QuickAssist_8wekyb3d8bbwe!App" />
                            </start:Group>
                          </defaultlayout:StartLayout>
                        </StartLayoutCollection>
                      </DefaultLayoutOverride>
                    </LayoutModificationTemplate>
                ]]>
            </StartLayout>
            <Taskbar ShowTaskbar="true"/>
        </Profile>
    </Profiles>
    <Configs>
        <Config>
            <UserGroup Type="AzureActiveDirectoryGroup" Name="b823d189-65b2-42bc-8275-ceg28c53a28d" />
            <DefaultProfile Id="{75076b41-9f9m-4b8r-accb-75kc6bce20a6}"/>
        </Config>
    </Configs>
</AssignedAccessConfiguration>
Configure in Intune
To deploy the XML, we need to create a custom configuration profile.
The OMA-URI for Multi-App Kiosk Mode policy is:
./Device/Vendor/MSFT/AssignedAccess/Configuration
Value: String (XML file)
Paste your XML file into the profile.
Additional Support
Whilst figuring this all out, i noted an Event ID error i received on a test device.
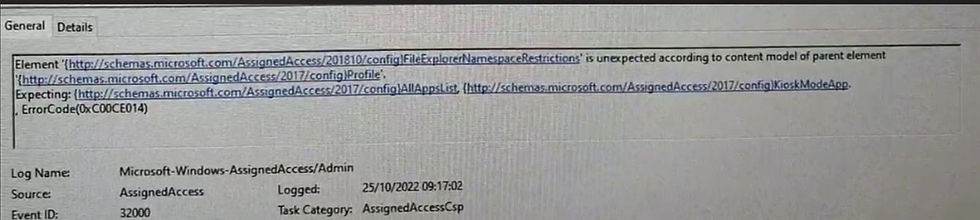
This was because I was missing required schema information under Access Configuration and left Start Layout information blank in the XML.